
In this article, we are going to talk about the repository design pattern and how to implement it in Xamarin.Forms application with SQLite local database and MVVM pattern. The applications nowadays are mostly data-driven, which means that they need a data store that is often databases. Because of this, I found it important to highlight this topic as it makes the logic of data access much easier, cleaner, and maintainable. The example used in this article will use the regular SQLite commands to implement the CRUD functions (Create, Read, Update, Delete).
But first, what are Design patterns?
Design Patterns:
Design patterns are models (templates) and principles that you can apply to your code that will solve a specific problem you are facing while developing your software.
These principles and rules are written by a professional and experienced group of software engineers, this group's name is Gang of Four (GOF). They released the first book that speaks about design patterns in 1994. Each pattern is created to solve a problem, as an example, another commonly used pattern is Singleton, which you can apply to a class to get a Single instance of it. So, it is good to know about them because they provide a tested and trusted solution for some common problems which will save you time and effort, and speed up the developing process.
Setting up:
You can download the attached project to check out how things are happening.
However, if you like to create your project then you will need to add the 'sqlite-net-pcl' to your shared project and the platform projects as well, the last stable version of the package when writing this article is 1.7.335. This is the only required package.
Case study:
Let us say that you are developing a very simple application to manage a school, where the school management needs to:
- Add student, delete student, update student info, get all students.
- The same functions for the Teacher.
The functions of the Student and Teacher are identical because we want to show how we can implement the function once and use it many times. The student model is like this:
using SQLite
public class Student
{
[PrimaryKey][AutoIncrement]
public int Id { get; set; }
public string FirstName { get; set; }
public string LastName { get; set; }
public string Address { get; set; }
public string Phone { get; set; }
public string DateOfBirth { get; set; }
}
And the Teacher model is like this:
using SQLite;
public class Teacher
{
[PrimaryKey][AutoIncrement]
public int Id { get; set; }
public string FirstName { get; set; }
public string LastName { get; set; }
public string DateOfBirth { get; set; }
public string GraduationDate { get; set; }
public string Address { get; set; }
public string Phone { get; set; }
}
The AutoIncrement and PrimaryKey are coming from the package we talked about in the Setting Up section and they mark the id of the teacher and student as a Primary key for the table and will auto increase them.
Tip: you can create a base class for all of your classes that will represent a table in the database and set the in-common properties between these classes in the base table, such as the id here.
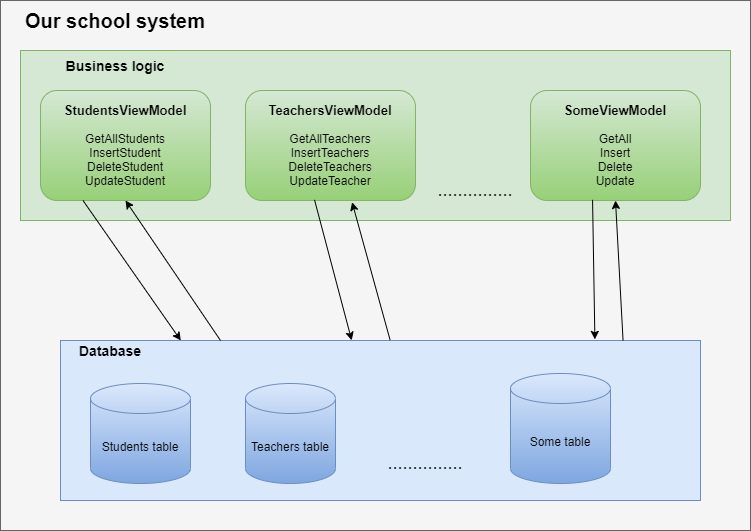
The easiest way to implement your app is to embed your database access code inside the business logic (The ViewModel), but believe me, it is not a good decision. That is because your business logic will mix up with your data access logic, which means it will be super hard to edit or maintain your code, and it will be impossible to reuse it again. If you followed this way, you would have to write the same code in all your ViewModels. Now imagine that you used this way with a big and complex application, any edit on the data access logic will be a pain literally. Therefore, that is obviously not the best practice as we faced these problems:
- Code repetition.
- Data access logic and business logic will be Mixed-up.
- Maintaining and editing will cost you a lot of time and effort.
- Inability to reuse the code.
Problems described in this image:
Here, the repository pattern comes to the rescue!
Repository Pattern:
The repository design pattern is commonly used in any application that needs a database. It is used as a layer above the raw database layer as it encapsulates the data access logic and isolates it from the rest of the application. So, it resides as a medium between the data store layer and the rest of your app. As described in the image below, the generic repository solves the problems that we already discussed and makes it easy to edit the data access logic among the whole application. Magic!
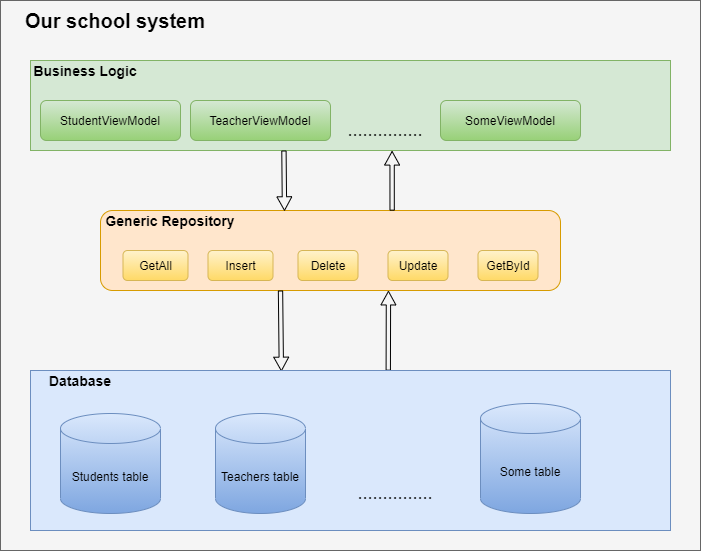
You can see that ViewModels are clean, and the data access code is isolated and reusable.
You can see that ViewModels are clean, and the data access code is isolated and reusable. As we said at the head of this article, we are going to use the basic SQL package functions but you can use any way you like, such as EntityFramework. So, let us start creating our repository, first, let us define the behavior by creating an interface called IRepository with an anonymous type T:
public interface IRepository<T> where T : new() {
List<T> GetAll();
T GetEntityById(int id);
void AddNewEntity(T entity);
void DeleteEntityById(int id);
T UpdateEntity(T entity); }</p>
This is the behavior of our repository. You can notice that we wrote "where T : new()" This is a constraint on the anonymous type which means that the type must have a parameter-less constructor. This constraint is a must when you are using the basic SQL package functions to access your database, it is not required when you use EntityFramework for example.
You can also notice that all the functions are basic CRUD functions, we will talk in more detail and more advanced concepts in part 2. Now, let us write the implementation of this interface:
public class Repository<T> : IRepository<T> where T : new()
{
public static string databasePath =
System.IO.Path.Combine(Xamarin
.Essentials.FileSystem.AppDataDirectory, "repository-example.db");
public Repository()
{
using (SQLiteConnection connection = new SQLiteConnection(databasePath))
{
connection.CreateTable<T>();
}
}
public void AddNewEntity(T entity)
{
SQLiteConnection connection = new SQLiteConnection(databasePath);
using (connection)
{
connection.Insert(entity, typeof(T)); } }
public void DeleteEntityById(int id) {
using(SQLiteConnection connection = new SQLiteConnection(databasePath)) { connection.Delete<T>(id); } }
public List<T> GetAll() {
List<T> result = new List<T>();
using(SQLiteConnection connection = new SQLiteConnection(databasePath)) {
result = connection.Table<T>().ToList(); } return result; }
public T GetEntityById(int id){
T result;
using (SQLiteConnection connection = new SQLiteConnection(databasePath)){
result = connection.Get<T>(id);}
return result; }
public T UpdateEntity(T entity){
using (SQLiteConnection connection = new SQLiteConnection(databasePath)){
connection.Update(entity, typeof(T));}
return entity;}}
First, you can notice that I defined a string variable databasePath that holds the path to our local database. To define this variable I used the System.IO Path class which contains the useful function Combine() that will combine a group of strings to give you a path format. I also used Xamarin.Essentials FileSystem class which contains AppDataDirectory property that will return the path to the directory where the application files are stored. It is cross-platform, which means it will give you the path whether your app works on Android or iOS. So, we are telling our Repository class to search for the 'repository-example.db' database in the path where the app data resides and If it does not exist, then create it so we do not need to worry about database creation.
In the constructor, you can see that we are creating a table in our database every time we instantiate the repository. But is that correct? Well, do not worry, this function CreateTable<T>() creates the table if it does not exist, if it already exists nothing will happen.
A very simple way to create SQLiteConnection to your database is to pass the database path to the constructor, and you are all set. The using statement is important here because it will automatically close the connection for you. If you did not use it then make sure to close the connection manually by calling the Close() function from the connection object.
In the repository class, we implemented the IRepository interface and defined the data access logic in our app.
Consume the Repository:
Since we implemented our repository, it is now ready to be consumed.
Now go to the ViewModel where you need to access your database and create an instance of the repository with the type you wish. As an example, if I want to consume the repository in the StudentsViewModel that is responsible for fetching all students from the database, I will do the following:
IRepository<Student> studentRepo; public StudentsViewModel() { studentRepo = new Repository<Student>(); }
I have created a new instance of the repository of type Students, which means that if the table 'Student' does not exist then it will be created, and you will be able to use all the repository functions that we already implemented on this table, just like this:
public List<Student> GetAllStudents() { var students = studentRepo.GetAll(); return students; }
We can do the same for the Teacher class. Just go to the Teacher part of the business logic and create an instance of the repository with the type Teacher, like this:
IRepository<Teacher> teacherRepo; public TeacherViewModel() { teacherRepo = new Repository<Teacher>(); }
And as you may expect we can do the following:
public List<Teacher> GetAllTeachers() { var teachers = teacherRepo.GetAll(); return teachers; }
We can do that for all functions we already implemented in the repository, isn't that great! Implement it once and use it unlimited times. Your data access logic now is super clear, separated from other parts of the app, easy to maintain and edit, and reusable.
Notes:
- The sample app focuses on the Repository Pattern, so the other parts of the app may not be implemented in the best practice.
- Consider adding try-catch in your repository, it is good to keep your app running in case of an exception thrown.
- You can use Xamarin.Forms Command in the view model and bind them to the buttons instead of the button event in the code-behind in each page.
- You must add some validation on the user input to avoid any probable issues, this is very common.
Conclusion:
The repository is such a great pattern that will isolate and organize your data access logic. You will need to implement the functions only once and you are all set! You can use as many as you want and with any table in your database. In addition, you can maintain the data access logic super easily across your app because it is already encapsulated and centralized in the repo. Go ahead and create your repository!
Hello MAUI!
8/7/2021
MAUI is the next evolution of Xamarin.Forms,Which is built on 6 Or 7 years Xamarin Forms experience,What is Blazor?
8/7/2021
In this article, we will understand what Blazor is, but before that, let's first understand how web applications are developed today
Introducing FlutterFlow
8/7/2021
Building Flutter apps is now faster than ever with FlutterFlow!
Next.js, an awesome piece of technology
11/7/2021
Next.js is a react framework, which It means It’s a platform for developing single page application using react , it makes the wesite faster and high performance

Ready to raise the difficulty level?